Burns Night Pie

Traditionally in Scotland on Rabbie Burn’s day, we have haggis, neeps and tatties. It wasn’t something we would have every year growing up but I do remember having it occasionally. My mum is vegetarian, so making a meaty haggis dish meant she couldn’t enjoy any.

With this pie, I wanted to make something that the whole family could enjoy, even the meat eaters. A layered haggis, neeps and tattie pie is the ultimate comfort cooking. The haggis mixture is rich and “meaty” despite having no meat. I used the Macsween veggie haggis, however this can be substituted easily for regular haggis. I also used Mash Direct’s mashed turnip, because would you believe my local supermarket had no neeps! This was a quick substitute if you are short on time, especially with how long turnip can take to boil. See the tips section at the bottom for even more tips on how to personalise this pie. 

Beware, this pie is extremely filling! 

Recipe serves 4 people 

Ingredients 

  • 454g veggie haggis  
  • 4 large potatoes 
  • Rapeseed oil 
  • 1 onion 
  • 1 carrot 
  • 500g tomato passata 
  • 125ml red wine 
  • ½ beef stock cube (approx. 5.5g) 
  • Mash Direct mashed turnip pack (400g) 
  • Knob of butter 
  • Milk 
  • Cheddar cheese, grated 
  • Flat leaf parsley, chopped 

Method 

  1. Heat oven to 200°C Conv / 180°C Fan. 
  1. Chop the haggis into bite-sized pieces and cook oven on a non-stick baking tray for 10 minutes. 
  1. Peel and chop the potatoes into even sized chunks. Boil for 25 minutes until a knife easily pushes through each piece. Mash with the butter and a drop of milk. Add more milk if the mash is too thick. 
  1. Dice the onion and grate the carrot. Fry in a drizzle of rapeseed oil until soft and the carrot starts to change colour slightly. 
  1. Add the haggis cubes and stir well. Add the tomato passata, red wine and beef stock cube. Simmer for 15-20 minutes on a low heat until sauce is thick. Stir occasionally to avoid sticking. Taste and season with salt and pepper. 
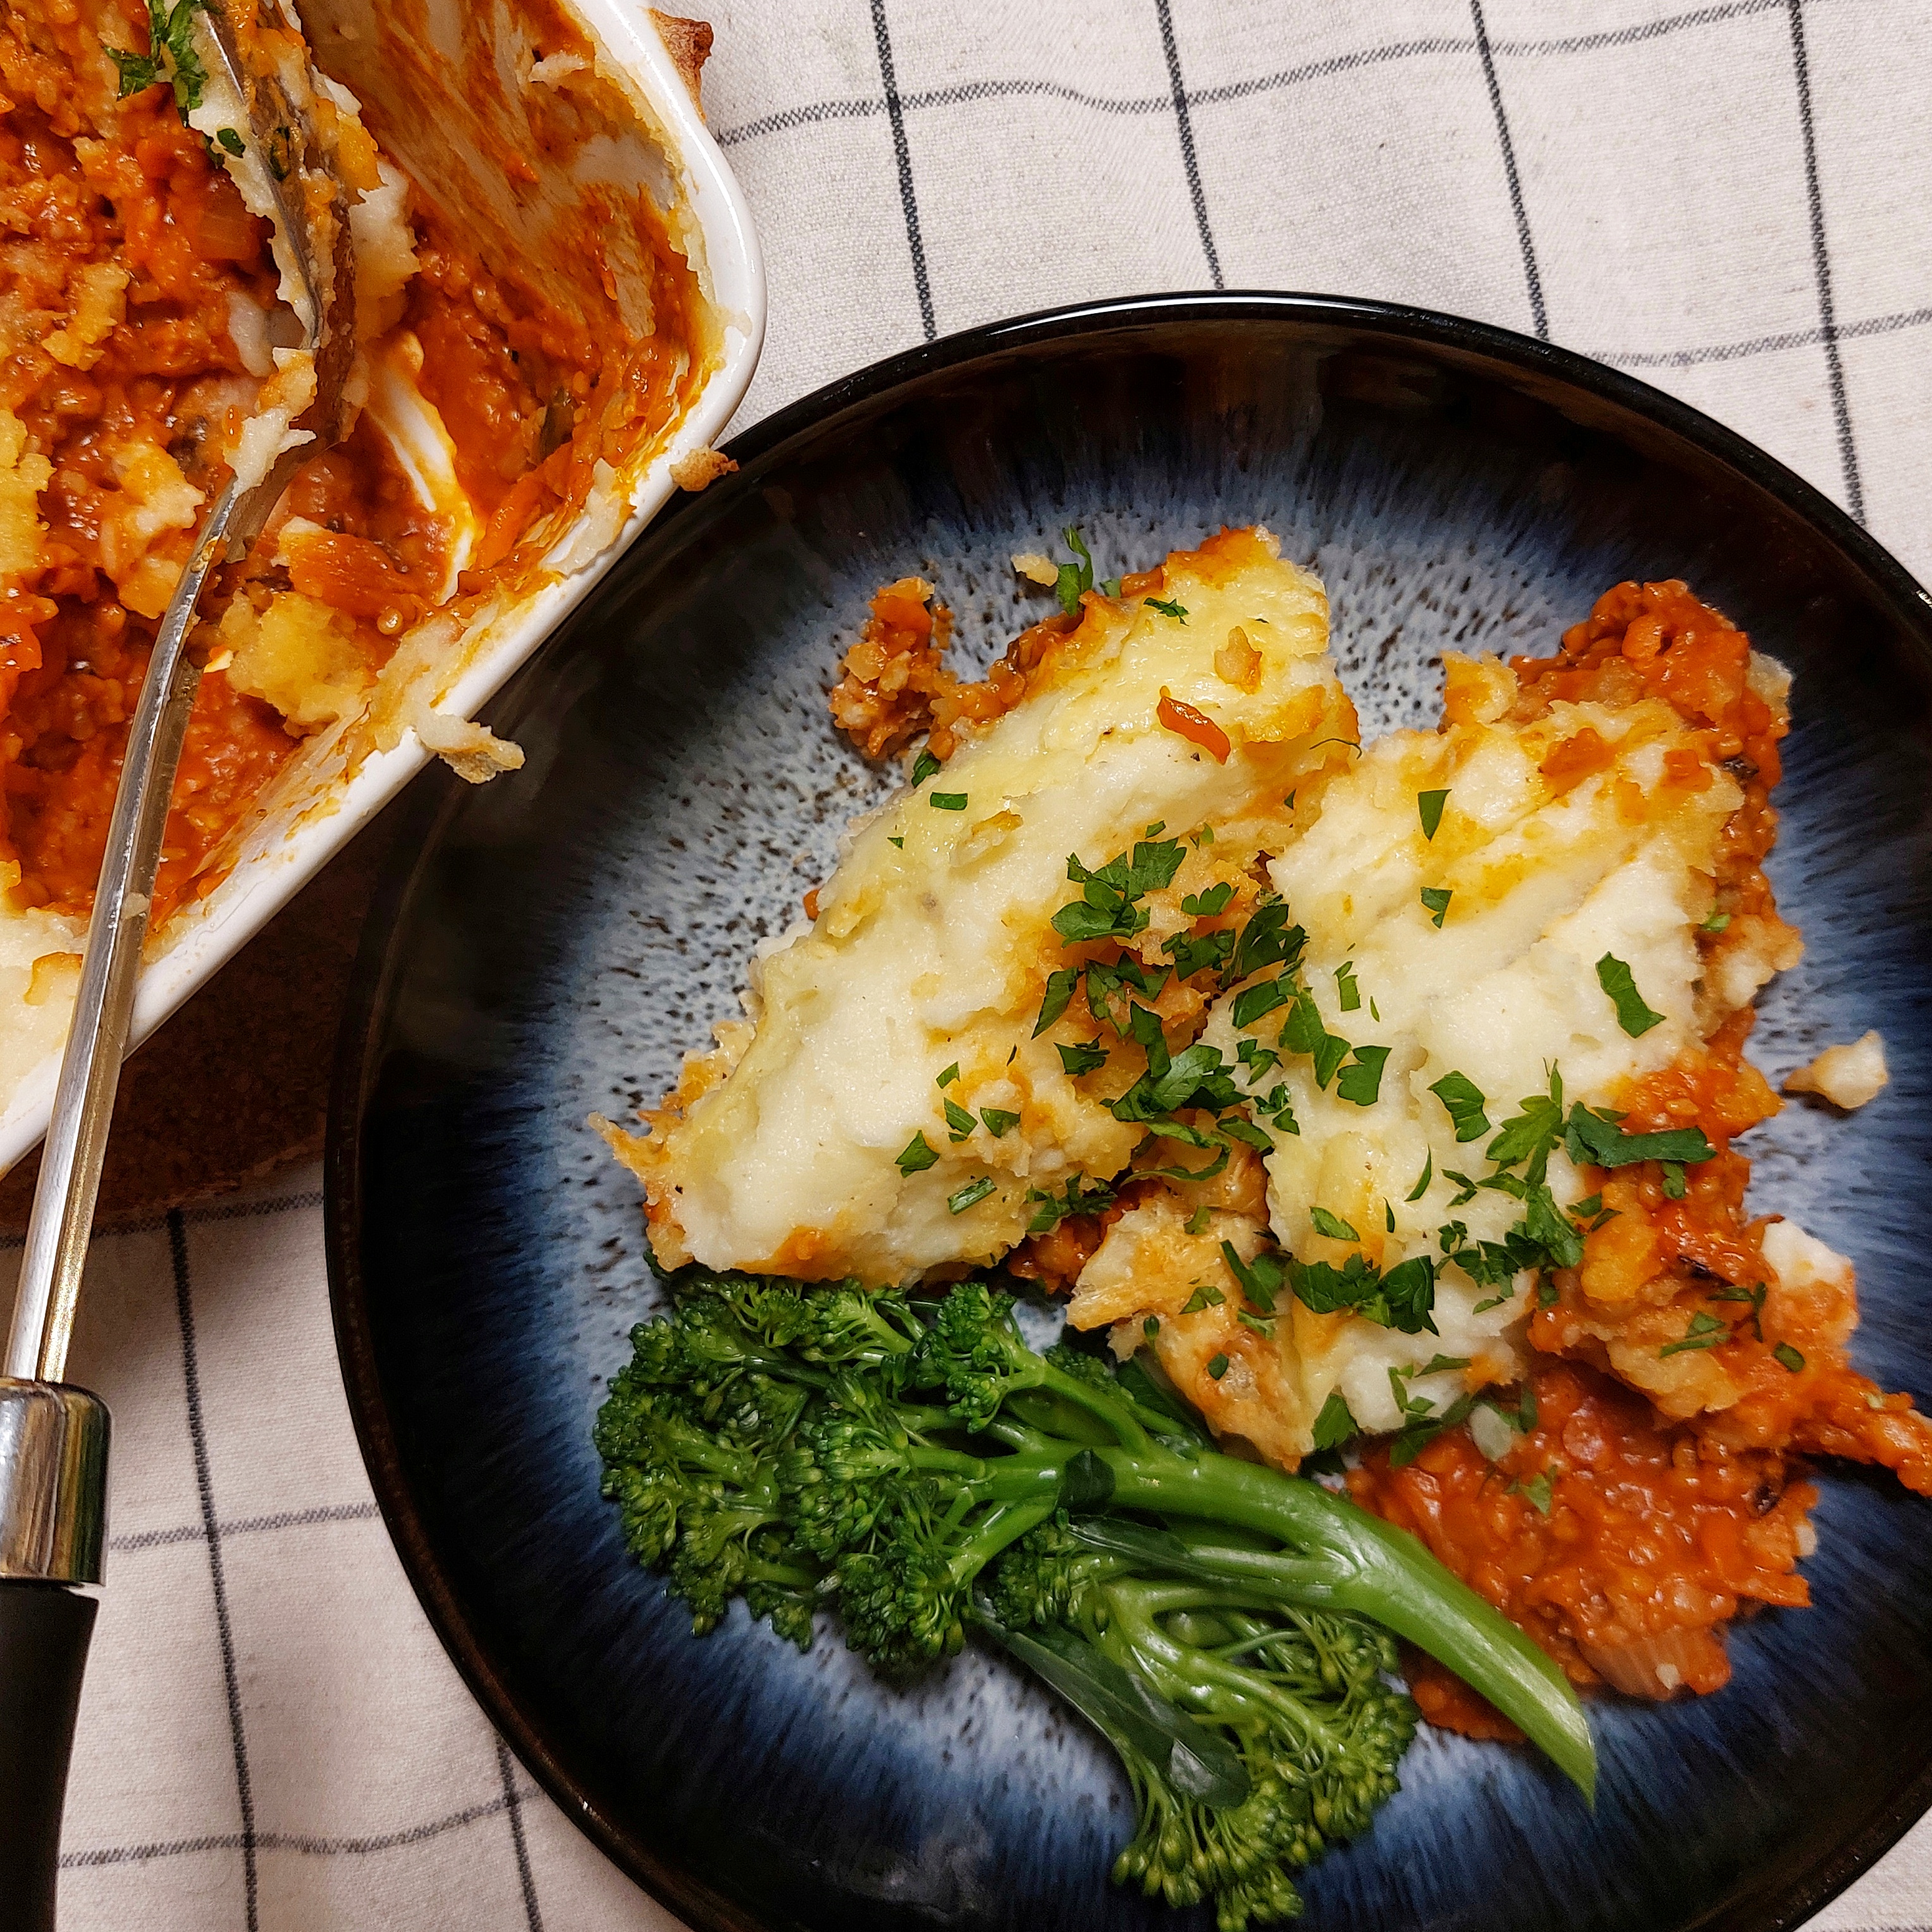
  1. Add the haggis mixture to a suitable deep oven-dish. Top with the mashed turnip and then with the mashed potato. Top with grated cheese. 
  1. Bake in the oven for 20-25 minutes, until the cheese is golden and bubbling.  
  1. Once cooked, serve and top with fresh parsley. 

Tips 

  • Substitute the veggie haggis for regular haggis for an even meatier flavour. 
  • Vegetarians – substitute the beef stock cube for a veggie stock cube. 
  • Vegans – this can be made vegan by using plant-based milk and butter in the mash, a veggie stock cube and dairy free cheese on top. 
  • This can be made a day in advance, just cook for longer and ensure the centre of the pie is 72°C prior to consuming. 

*This post does not contain any ads or affiliates. All products have been paid for and I am not being asked to promote.* 

Green Pesto Gnocchi

We LOVE this recipe in our house! Is there anything better than getting all your weekly iron intake in one meal, but also it being super yummy? And the best bit, you can serve garlic bread on the side. 

One colleague at work even referred to me as the Gnocchi Queen recently as I regularly take the leftovers to work the following day and load it with cheese.  

The best thing about this recipe is how flexible it can be. You can do it with any veg, my favourite is green veg. I just throw in whatever we have in the fridge. You could also roast some squash or pumpkin to put through it for a more wintery meal too. And of course, the green pesto can be switched for red pesto if you prefer.  

I will also often serve this with chicken sausages, Heck or Aldi’s Italian Chicken Sausages would be my recommendation.  

Recipe serves 2-3 people (2 hungry people, plus one leftover lunch-sized portion)  

Ingredients 

  • Knob of butter 
  • 500g gnocchi (chilled or dried aisle gnocchi both work) 
  • Olive oil 
  • 5 stems of tenderstem broccoli 
  • 1 leek, finely sliced 
  • 1 clove of garlic, finely chopped 
  • 2 handfuls of spinach 
  • 3 heaped teaspoons of green pesto 
  • Parmesan 
  • Basil, chopped 

Method 

  1. Heat the butter in a large frying pan and once melted, add the gnocchi. Fry for 15-20 minutes, tossing every few minutes to prevent burning. 
  1. For the veg, chop the tops off the broccoli and finely slice the stems. Add the stems to a separate pan with a drizzle of olive oil, I use a wok or a large frying pan.  Fry for 1-2 minutes. 
  1. Once the stems have turned bright green, add the rest of the broccoli, leeks and garlic. Fry for 10 minutes or so on a low heat until the veg is softened.  
  1. Finally add the spinach and pesto and stir. 
  1. Once the gnocchi is crisp and golden, add to the pan with your veg and combine.  
  1. Serve immediately and top with parmesan and basil, salt and pepper to taste.  

Truffled Mushroom Carbonara

I am a big pasta lover. I put it down to having an Italian name, I am an honorary Italian! In 2015, we visited the Amalfi Coast and it is still my favourite holiday I have ever been on. The food was so fresh and the scenery was spectacular. Sitting outside in the town square having an iced espresso whilst warming our pale Scottish skin in the sun was just heaven. What I would do to go back and relive it all again!

I cook pasta at least twice a week. It is a staple for me, one of those things that you always have in your cupboard in case of a we-don’t-know-what’s-for-dinner night. My favourite pasta to order when out is carbonara – I am a sucker for cream and cheese! Not to mention the salty bacon lardons and fresh parsley.

Over the years, I have tried many a “carbonara” recipe at home and I think I have perfected it this one. Now, I’m not claiming this is a real carbonara because every Italian out there is probably screaming at me, saying I’m now not an honorary Italian after sharing this recipe! But this is my twist, and it is fairly light for a balanced mid-week meal. Super quick and easy, there isn’t really much that can go wrong with this one.

You can do any combo with this, add any veg or flavourings you like (I also like bacon and courgette), but for this recipe, I am doing my Truffle Mushroom combo. We were given some truffle oil from Truffle Hunter for Christmas and it is so versatile and flavourful. I then received black truffle salt for my birthday, which finishes off the dish perfectly! We have the pair of black and white truffle oil and I use them in different ways. The white truffle oil is light and fragrant, good for topping risottos, salads or even truffle parmesan fries. The black truffle oil is a much richer, earthier flavour, making it perfect for recipes like this.

Truffle oil should never be cooked or heated however, it destroys the flavour of the truffle. It is typically a finishing oil. This recipe involves stirring the truffle in after the pan has come off the heat.

Recipe serves 2-3 people (2 hungry people, plus one leftover lunch-sized portion)

Ingredients

  • 200g pasta (Tagliatelle or linguine is good for this)
  • Knob of butter
  • 250g mushrooms, sliced (I like chestnut mushrooms for this)
  • 2 cloves of garlic, crushed
  • Fresh parsley (I used frozen chopped parsley)
  • 3 egg yolks
  • 5 tbsp double cream
  • 1 tsp truffle oil
  • 25g parmesan plus extra for sprinkling on top

Method

  1. Cook the pasta in a pan of salted water according to the pack instructions.
  2. Add the butter to a large frying pan on a low heat until melted.
  3. Add the sliced mushrooms to the butter and fry until softened, approx. 5 minutes.
  4. Add the garlic and parsley and cook for a further two minutes.
  5. For the sauce, in a jug whisk together the egg yolks, double cream, and a pinch of salt and pepper.
  6. Drain the pasta, setting aside a cup of the starchy pasta water for later to make the sauce super silky.
  7. In the frying pan with the mushrooms on a VERY low heat, add the pasta and the eggy sauce mix. Add a small dash of starchy water and stir constantly. (By stirring all the time, you are preventing the eggs from scrambling).
  8. If the sauce looks a little dry, add a bit more water and keep stirring over the very low heat until the sauce is hugging the pasta, and looks thick and silky.
  9. Turn off the heat and add the truffle oil and parmesan. Stir the combine until parmesan has melted.
  10. Serve immediately and top with more parmesan, salt and pepper to taste.

[AD] Feature – Olive Alexanders

This post contains gifted items from Olive Alexanders.

To celebrate reaching 500 followers on my Instagram account and the launch of the blog, I have launched a giveaway for you to have the chance of winning a cheese board selection box from Olive Alexanders! Head over to my Instagram page to enter, but please read on to hear about the friendly team and delicious products at Olive’s.

Olive Alexanders are a new local deli in Aberdeen. They opened online during the pandemic and deliver their cheeses, meats and wines not only locally, but nationwide. The girls are so friendly and are willing to help with any cheese related questions – they even provided me with a little information sheet for all the cheeses I purchased!

Their online store sells a variety of deli products, including cured meats, bread and all the condiments you can dream of. They also have a wine subscription service, which if you are a wine lover is definitely something to sign up to!

As part of the giveaway, in the cheese box, you get 4 different Scottish cheeses, 2 types of crackers and a jar of chutney. Everything is so beautifully packaged, and the cardboard box that the cheese selection comes in is of course recyclable. The Olive Alexanders logo immediately catches your eye as you open the box. The cheese is packaged in parchment paper, the best way to store your cheese to avoid it sweating!

The four cheeses you receive in the cheese box are from three different Scottish suppliers.

Highland Fine Cheeses produce both of the blues in the box, the Blue Murder and the Strathdon Blue. I am not a huge fan of blue cheese, but even I liked the Strathdon blue. It is a more subtle blue than Blue Murder and slightly peppery too. Mr E.S loved the Blue Murder, with it being a deeper flavour with more marbling.

The second producer, The Island Smokery, produces the Orkney Dark Smoked Cheddar. This is a gorgeous cheese, triple smoked over their own wood blend. Creamy and salty, it paired with Olive Alexanders chutney perfectly. This was a close contender for my favourite, especially when paired with the beetroot, potato and spinach crackers.

The third and final producer is Dunlop Dairy who produce the Traditional Ayrshire Dunlop. This hard cheese has a sweet taste to it, again complemented perfectly with the apple and tomato chutney. The Dunlop was my personal favourite – creamy and subtle to taste, the most moreish in the box. The girls at Olive’s described it as if Gouda and Cheddar had a baby, it would be the Dunlop and I completely agree!

In addition to the cheeses in the box, I also purchased the Clava Brie. I am a huge lover of soft creamy cheeses and this was no disappointment. I will definitely be purchasing this again on the regular. It paired perfectly with the Westray Bakehouse Water Biscuits in the cheese box and is the perfect soft cheese addition to the cheeses included in the box.

The cheeses are best enjoyed when removed from the fridge for an hour prior to eating. This gives you time to set up an epic cheese board and make it an extra special evening! We were also very kindly gifted a bottle of Kotuku Sauvignon Blanc by the girls at the deli too, which was beautiful and really easy to drink. Usually, my go-to wine is red or rose, but I would definitely purchase this one again and it’s made me curious to explore more whites! If you fancy your chances at winning the cheese box, please head over to my Instagram to enter. Also head over to Olive Alexanders, you will not be disappointed with the range of products on their website! Now, be right back as I’m going to demolish the rest of our cheese box with some wine.. cheers!

Cinnamon Doughnut French Toast

For my first blog post recipe, I knew I wanted to post something pretty special. In our house, we love a good brunch! Prior to lockdown, one of our favourite past-times was visiting a local café for a coffee and brunch. Our favourites are Coffee Apothecary (both Ellon and Udny), Cup Café on Belmont Street and the famous Food Story. However, we do also love making a good brunch at home too. But we rarely do a sweet one, so this was a different one for us.

I used to love French toast when I was a child, it was one of the first recipes I learned to make on my own, using a DK recipe book (old school haha). When I suggested to Mr E.S. that we make a French toast brunch for our Valentines foodie weekend, my imagination went wild with the possibilities of toppings and what would happen if I made it sweet (instead of with ketchup how I had it as a child).

Introducing, my Cinnamon Doughnut French Toast recipe!

Thick, soft French toast tossed in a cinnamon sugar, ready to be topped with your favourite sweet finishing touches. We had ours with fresh strawberries, smoky bacon and lashings of good quality maple syrup. If you make this one yourself, please tag me so I can see what toppings you chose!

Recipe serves 2 hungry people

Ingredients

  • 3 large eggs
  • 100ml semi-skimmed milk
  • Pinch of salt
  • 3 thick slices of bread (slightly stale is best)
  • Knob of butter
  • 70g caster sugar
  • 2 tsp cinnamon
  • ½ tsp nutmeg

Method

  1. In a wide bowl or baking dish, whisk the eggs, milk and salt together.
  2. On a plate, mix the sugar and cinnamon and spread in an even layer.
  3. Heat a good non-stick frying pan and add a small knob of butter.
  4. Dip both sides of the bread quickly in the eggy mixture, not too long or else the inside of the bread becomes soaked and soggy.
  5. Put straight into the pan and flip regularly until dark golden on each side. Squash with a spatula every few flips to ensure the inside is cooked too.
  6. Once golden, take out of the pan and lay the fried bread in the sugar. Flip so both sides are covered in the cinnamon sugar and serve immediately.

Welcome!

Hello and welcome to eat.seasonal blog!

In late 2018, I started an Instagram page as a way of re-igniting my love of creating recipes and making food that not only tastes good, but looks good too.

Here we are, over two years later, with over 500 followers now in my little community. It felt only right to have a space where all of my recipes could live, breathe and be shared with you all!

For now, I am remaining anonymous (cue Gossip Girl xoxo), however I promise it won’t stay that way forever! For now, please enjoy the page and can’t wait to see what you think.

Love,

Miss Eat Seasonal x